|
While the Interactive Maps were designed to be fairly easy and intuitive to use, I've decided to include this page that describes their functionality in detail. You shouldn't need to read this page unless you wish to explore every little facet of the interactive maps, or if you have any problems getting them to work properly. The last section deals with technical issues that you may experience.
The interactive maps allow you to hover the mouse cursor over various parts of each map and see detailed information about that particular area or place. Not every section of a map contains information - each region of interest is surrounded by a colored circle; I'll refer to these colored circles as area icons. Typical areas that do provide detailed information are diamonds, Jackal Tapes, checkpoints, towns and bars, weapon shops, named areas (such as Fresh Fish and Mokuba) and many more. I've also included screenshots of all these areas, which are especially useful for locating the diamond briefcases.
Area icons come in different categories and for the most part they have a unique color. Checkpoints, for example, are one category and they are all represented by a red area icon. Safehouses are a different category and they are indicated by a green area icon. You can choose to show or hide different categories by using the links at the bottom of an interactive map. For more information refer to the section about Showing and hiding area icons.
While I've tried to include as much information in the interactive maps as possible, there are a few things I've left out. I haven't added every single vehicle, for example, especially since many of them can be found in "regular places" such as outside safehouses and near checkpoints; although I'll often describe which types of vehicles are available at checkpoints. Also, named areas only rarely contain any area icons inside of them - to see equipment that's available at a named area, refer to the Areas page; when you hover the mouse over a named area, the information box will include a link to that specific named area, thus providing easy access to see a detailed view.
| When you hover the mouse cursor over an icon, an information box is displayed. This box contains specific information about the area or item that the icon represents. For a diamond briefcase, for example, the information is a description on where (and possibly how) to locate the briefcase, along with the number of diamonds contained within. As mentioned above, the information box will also include a screenshot of the item or area in question; click the small screenshot to view a larger version.
The information box includes a title bar at the top; the title bar includes a small icon (on the left side) and a title that indicates what type of category the icon represents. On the right side you'll find a number and an additional two icons. The number (eg. #3) is used to easily differentiate each specific icon - since a map can have any number of checkpoints, safehouses, diamond briefcases, etc. in it, the numbers are a way to uniquely identify a specific icon within a certain category. For example, diamond briefcase #7 in the northern region of Leboa-Sako is the one located near the center of the region, east of Shwasana; click here to see for yourself. The first icon next to the number -  - allows you to hide the information box and the current icon. This will temporarily hide the icon from the map which is especially useful if one icon "gets in the way" so to speak. The next icon - - allows you to hide the information box and the current icon. This will temporarily hide the icon from the map which is especially useful if one icon "gets in the way" so to speak. The next icon -  - simply closes (or hides) the information box. You can also click on any place on the map that doesn't have an icon in it to hide the information box. - simply closes (or hides) the information box. You can also click on any place on the map that doesn't have an icon in it to hide the information box.
|
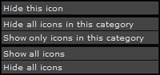
The menu of the Information Box |
Sometimes you may wish to hide certain area icons for various reasons. In some situations the icons can be very close together and it can be tricky to get the right one to "trigger". Other times, you may simply wish to focus on one particular category of icons - diamond briefcases are a good example. Once an area icon is hidden, the according colored circle will disappear from the map. Once you show an icon (or category) again, the circle will reappear. To show and hide areas you have a number of options available.
You have the option to show or hide all icons, a certain category of icons (eg. only checkpoints), or a single icon. You can show and hide icons and categories in a few different ways. Beneath each interactive map you'll find a collection of links that work on different categories. These links allow you to show or hide all icons of that category, or only show (or only hide areas) in that particular category. As explained in the previous section, you can use the icons in the title bar of the information box to hide an active area icon; if you click the icon on the left side of the title bar in the Information Box, you'll get access to a small menu that also provides a few options for showing and hiding icons.
| While you can use the website menu to navigate between the different regions and distrcits, I've included a "quick navigation feature" at the bottom of each interactive map right next to the links mentioned in the previous section. This feature includes two distinctive maps - one of the current district, and one of entire world in Far Cry 2. The world map allows you to change between the two districts (and the Central Desert in between), while the district map provides quick access to all the regions in the current district. Simply click a district or region to go to an interactive map of that area. A light green border in each map indicates which district and region you're currently looking at.
|
The interactive maps relies on JavaScript - a client-side scripting language used in web development. If you have no idea what this means specifically, don't worry too much about it. Alot of websites makes use of JavaScript, and all modern browsers provide support for it. So unless JavaScript is disabled in your browser, or it doesn't support it, you shouldn't have any problems with the interactive maps. I have tested the Interactive Maps with the following browsers: Internet Explorer versions 6 and 7, as well as Mozilla FireFox versions 2 and 3, and Opera 9.62.
If you do have any problems with the Interactive Maps, please make sure that JavaScript is enabled in your browser. The following sections details how to enable it in some of the most common browsers. If your browser is not listed below (or you don't have the latest version), please refer to the following page: Mr. Ed's Computer Help Forum  . If you already have JavaScript enabled, or enabling it doesn't work, and you still can't get the Interactive maps to function properly, I would strongly urge you to either upgrade your browser, or install another browser that fully support JavaScript. If you still encounter any problems or errors using the Interactive Maps, feel free to contact me; I can't promise anything, but I'd definately be interested in knowing about any issues you may experience. . If you already have JavaScript enabled, or enabling it doesn't work, and you still can't get the Interactive maps to function properly, I would strongly urge you to either upgrade your browser, or install another browser that fully support JavaScript. If you still encounter any problems or errors using the Interactive Maps, feel free to contact me; I can't promise anything, but I'd definately be interested in knowing about any issues you may experience.
- Open Firefox
- Open the Tools menu and click Options
- Click on the Content icon at the top of the Options dialog
- Check the box next to Enable JavaScript
- Click OK at the bottom of the dialog
If you had an interactive map open in Firefox while doing this, please refresh the page by clicking the Refresh icon (or by pressing F5).
- Open Internet Explorer
- Open the Tools menu and click Internet Options
- On the Security tab, click Internet
- Click Custom Level at the bottom of the dialog window
- In the list that appears, scroll down to Active scripting
- Click Enable
- Click OK to close the list and OK again to close the dialog
If you had an interactive map open in Internet Explorer while doing this, please refresh the page by pressing F5.
- Open Opera
- Open the Tools menu and click Preferences
- Click the Advanced tab at the top of the dialog
- Click Content in the list on the left side
- Check the box next to Enable JavaScript
- Click OK to close the dialog
If you had an interactive map open in Opera while doing this, please refresh the page by clicking the Reload button (or pressing F5).
|

 Introduction


 - @dawnrazor73